I've been on Craigslist a lot. I mean like every day a lot. Sometimes in the morning before I go to work, sometimes on my lunch break, a lot of times when I get home at night. Craigslist is my new vice.
It started out simple enough, I was looking to sell an old dryer that came with the house. A couple of pictures, a quick posting on the appliance section and within two hours I'd sold the dryer for $100. Sweet! Later I would go on to sell a set of windows and a kitchen stove for my parents, and also post a couple different garage sales.
While waiting for calls, I poked around Craigslist sections looking at other stuff, like the free section. My eyebrow went up as I saw some of the stuff that people were just trying to get rid of. Desks, cupboards, vanities, 2x4's, u-haul fire wood. Pretty much anything that they didn't want to haul off to the dump or the goodwill or hold a garage sale for was up for grabs. This got me thinking about the old junk that I had laying around the house that I didn't want to deal with, such as a big horking 80 gallon hot water heater, a heavy as hell cast iron kitchen sink, or a huge aluminum TV antenna that was strapped to my chimney when I bought the house. Turns out people flock from miles around in their pickup trucks for the opportunity to take your old scrap metal away for free. I only later figured out they were making big bucks recycling that metal. My sink alone must have weighed 250 lbs. At scrap pricing that could have been a good chunk of change!
I bought a few things too. One time I got two computer desks, one for each kids room. I also got a nice Sauder fold up computer desk for Gennie, which looks like a free standing closet, but then when you open up the doors it turns into this big workstation with file cabinets, shelves, peg boards and a computer.

Recently I got a Kobalt sliding compound miter saw from my wife for Christmas. It really was a nice gift and a good saw. The problem was, I show at Lowe's all the time and I knew what she paid for it. I also knew how much use I was going to get from it because it's a somewhat limited type of saw. My table saw can do an awful lot of things for me that a compound miter saw can't. The miter saw is really only good for a couple of things, chopping long boards and cutting precise angles. These two things gave me a lot of heartburn because I really didn't want an overpriced saw that I wasn't going to use a lot. It was super nice of my wife to buy it for me, but it just wasn't what I wanted. I eventually worked up the courage to ask her if I could return it.
The act of returning the saw caused an unexpected chain reaction that has caused me to wonder if I need to admit that I have a problem.
During the build up to returning the saw, I did a lot of Craigslisting looking for miter saws that people were selling. Turns out there are a lot of people cleaning out their old tools around Christmas time when they get new ones to replace the old. Craftsman, DeWalt, Delta, Porter Cable, all the major brands, available in various conditions from barely used to looks like crap and doesn't run. The thing is, the pricing was all over the place! A barely used Craftsman could go for $50 bucks while a doesn't run Porter Cable could be $100. Don't argue quality with me on this one because "doesn't run BMW" is worth less than "runs great Honda" in my book any day.
In returning the saw, Gennie told me, "I got you the saw because I want you to have tools that you use and will make you happy." Well... that in my mind turned into, "I give you permission to buy all the tools you possibly can to have a workshop full of every tool you'll ever need so long as you use the money that you get back from returning the saw." YAY!
From that moment I have been on Craigslist looking for everything I could find that fit the bill for my new workshop. I have $200 bucks to spend.
I already owned a table saw, one I've had for many years and I know how to compensate for it's complete and utter inaccurate cutting fence to get mostly accurate cuts. I also own a belt sander, circular saw, saws-all, a crappy jig saw, a broken 10" miter chop saw that was rusted stuck and a toolbox full of misc tools, including a very nice craftsman socket set my parents got me as a high school graduation present.
My wish list includes: Router w/ table. Miter / chop saw. Drill press. Vise. New jig saw. Table top scroll saw. Band saw. Jointer, 6" preferred. Thickness planer. Bench mounted grinder. Mounted sander. Air compressor. Brad nailer. Spray paint gun to go with air compressor to make painting easier.


I set out on Craigslist looking for my Router. They run about average of $130 in stores for a fairly good model at Lowe's. I want to get something for $50. I figure I can build my own router table if I can't get one cheap. After three days of looking, I stumble across an ad for tools for sale, must sell quick due to move. Router, $10. I'm on the phone within 20 minutes of that Ad posting and get an appointment to go pick up the router the following morning. Also I express interest in their $15 jig saw, $10 halogen work light, $10 palm sander and $10 half ton cable manual cable hoist because it seemed like a good deal, though I have no idea what I'm going to do with it. Grand total: $55 and two things marked off my list with three extra things that I didn't know I needed.
 |
| "Shane" |
The next ad that I responded to was for a $40 drill press. This one seemed like a good deal and indeed it does work well. It still have no idea what brand the press is as I can't find a label anywhere on it. So it is simply called "Shane", because that's what the former owner had engraved on it. Grand total: $40
I almost went off the deep end when I found a 12" sliding compound miter saw from DeWalt for sale for $250, complete with two new Diablo blades and a stand. I even had an appointment to go up to Marysville and pick it up, and also went to the bank and withdrew the money to get it. Fortunately my frugal (cheap) nature got the better of me, along with the look I got from Gennie when I told her what I was going to do, and I canceled on the guy. That saved me $250 and a blown budget.
The compound miter saw debacle reminded me that I'm not in the market for hot rod tools for nearly full price. So I responded to another ad for a $50 Delta chop saw. This person was a flake. Why post something if you are out of town and not available for five days? Why keep scheduling for the next day when you probably won't be available? His flakyness cost him the sale (with me any way).
 |
It may be dirty and
inaccurate, but at least
the blade is dull. |
Instead, while I was waiting for him to set a time, I took another look at my old broken down chop saw that I got for $5 at a garage sale six months earlier. The motor worked fine but the blade was a rusty hunk of crap. Also, even though it was supposed to be able to miter, it was rusted in place so it wouldn't rotate. I took all the screws out of the base and tried to detach it. I even banged it with a hammer a few times left and right (which turned out to be a mistake) and eventually figured out that there was a corroded shim screwed in on the underside which I was able to get loose with liberal application of WD-40. When that came loose the whole assembly dropped out the bottom of the stand. I sprayed it all with some solvent type cleaner to clean up all the corrosion and rust and even took some fine grit sandpaper to the edges to get it to rotate again.
After an hour or two of cleaning, I put it all back together. It pivoted well to the right, but only went about 10 degrees to the left before it pinched and got jammed. I noticed that it wasn't exactly flush and realized that my previous hammering had dimpled it a little. I tried to force it...with the hammer... and ended up breaking the handle off. Great. So I took it apart again and inspected the dimple. I was able to bang that back into place and it now turns perfectly about 50 degrees left and 50 degrees right. But the broken handle was going to ruin the whole thing because It wasn't a replaceable part. The whole cast iron housing had sheared off.
 |
The whole housing
broke right off |
 |
Good stuff, so far
no complaints |
I thought that would be the end of that, 2 hours and $5 bucks down the drain. But no! I will not give up! I called on my friend Mr. Google and asked him what he would do if he were in the same position as I and discovered a neat little thing called EPOXY. Yes, I had heard of it before, but it was always such a hot mess that I had sworn it off years ago. But I was given new hope by the countless helpful comments from other successful epoxy users that I gave it a go. For just $4.99 + tax, shipping, packaging, handling, hidden fees, miscellaneous charges, FDIC insurance a stolen identity and five days waiting time, I got a wonderful product called Loctite Epoxy Weld. It worked absolutely perfectly! I mixed up a teaspoon sized batch of the stuff and had about 8 seconds to apply it, but thankfully I had a few toothpicks at the ready and I smeared on the goop to all the edges of the broken housing and squeezed them together. I ran a bolt through two pieces of scrap plywood and tightened it down so that the pieces would be as tight together as possible and let it cure for a day or two before putting it all back together. The final piece was a fresh harbor freight 10" blade to replace the club that had been passing as a saw blade. Total price for my miter chop saw? $22 bucks.
Later that week I found a $50 thickness planer for sale in Port Orchard. It was advertised as a 10 inch planer with extra blades though the picture clearly showed it was 12 1/2 inches. I called immediately and got an appointment to go pick the planer up. I left just after work, thinking I could get there by six, get the planer, get home by seven. Sadly, this proved to be overly optimistic. It turns out that traffic makes it impossible to get to Port Orchard from Seattle at 5 pm in any time less than 3 1/2 days. Also, by the time I made to past Federal Way, Gennie had gotten my text asking if it was ok to go get the planer. She responded by calling me and reminding me that we needed to be at the neighbor's house for dinner by 7. Based on the current traffic (and the sinister undertones in my wife's voice) I immediately abandoned my quest for a $50 dollar planer and headed home as fast as I could. I called the guy and apologized for standing him up though because I figured he should be free to sell it to someone else, which he did the very next morning. Bummer!

The next item I found on Craigslist was a bench top scroll saw with sander attachment. This was for sale for $25 dollars and I thought it was going to be absolutely perfect, except that it was way the heck down south across the water and into the woods. After getting an appointment to pick it up and getting an address that it is only about a mile from where my friend and coworker Gigi lives. She had heard of my previous debacle with the Port Orchard thickness planer and asked why I hadn't called her to go get it. So, because she seemed willing before, why not ask her again? Sure enough she was more than happy to go pick up the scroll saw, and about 15 minutes later it was in her possession! She simply brought it to work with her the next work day and it was mine! $25 bucks. Thank you Gigi!
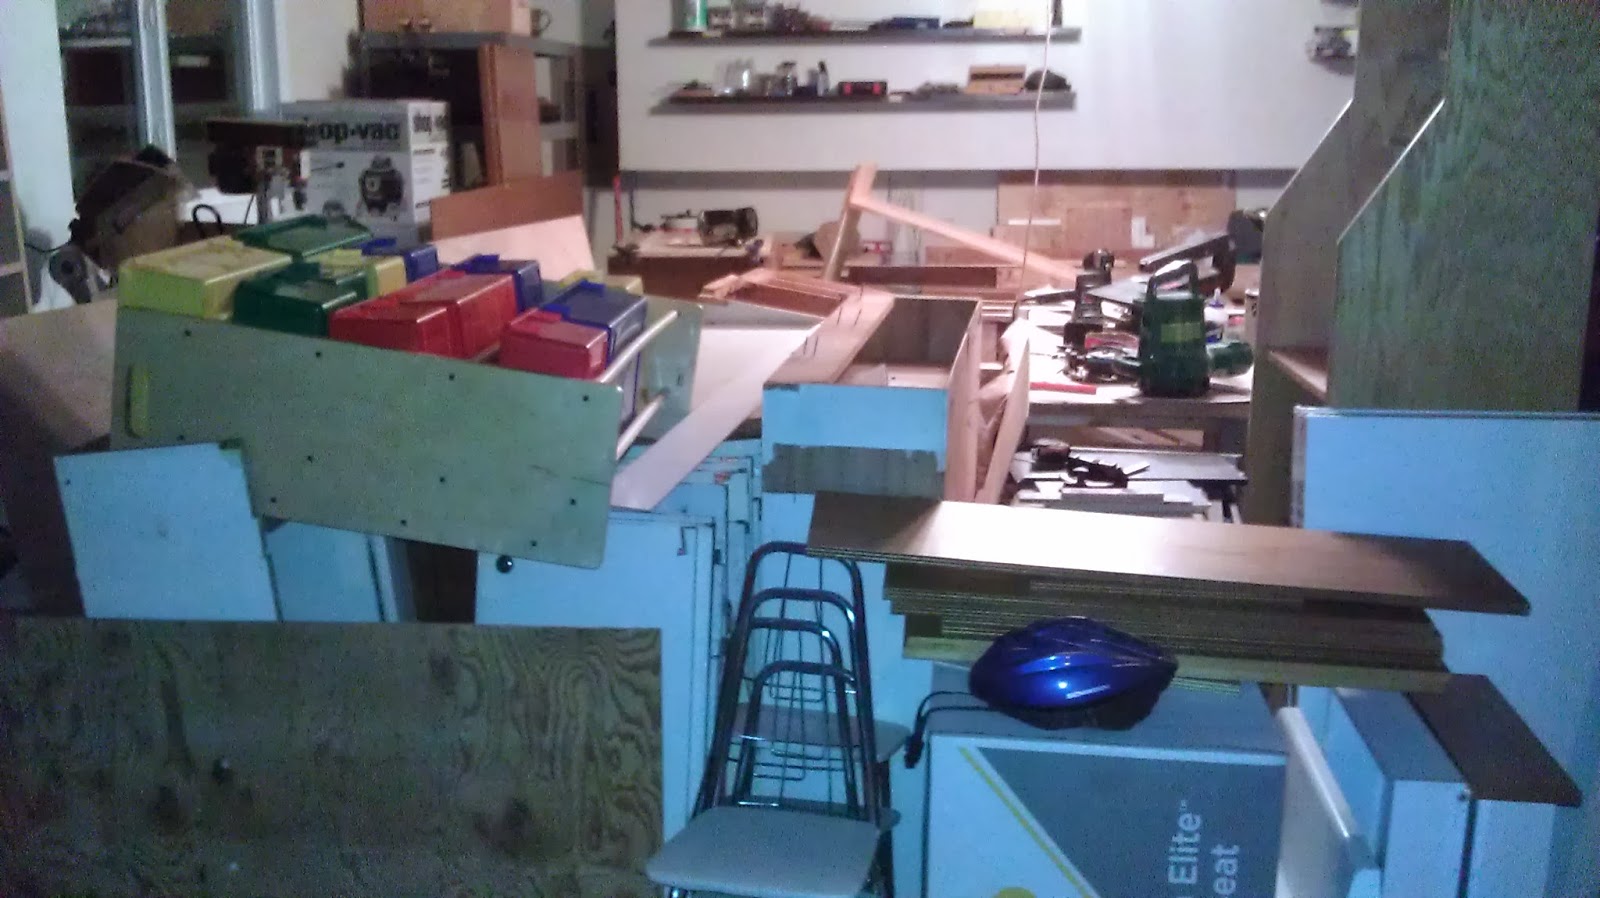
At this point, things start to get a little odd. I haven't actually done anything with the tools, so they are now starting to pile up. I decide it's time to start actually turning my garage into a workshop. This is when I realize that tools may be cheap and easy to come by, but wood is expensive! I would need a big layout table, and a place to put my router and drill press and chop saw and table saw and room to expand for all the things I want in the future. Oh and I want some shelves and drawers and... oh dear. My budget it going be blown. Just a single sheet of plywood is like $40 bucks at Lowe's.
Enter Craigslist once again. Only this time instead of the tools section, I start to think about the Free section. What if someone is giving away something that I could take apart and use in a different way. Maybe I could harvest the wood and turn it into a great workbench? It's not like I need long 2x4's and full size sheets to make shelves and drawers and table legs. I only need a big sheet for the table top... and even then there are other options.
So now I am finding out that if you don't get something quick from the free section, they give it away to someone else. So I am emailing people right and left. Free desk here, free cabinets there, free bookshelves there... Out of about 20 emails I sent to free stuff people, I was actually able to score some pretty neat stuff. The problem with some of it was that I needed to rent a U-haul trailer to transport it. $30 bucks a pop.
 |
| From Craigslist... |
 |
| ...to my laundry room! |
I got these cabinets for free and as it turns out do not need any additional work. Instead of using it in my garage, I'm going to install them in my laundry room for extra storage and counter top space. However, because the top unit is all once piece, there's no way it was going to be moved in the car. On the plus side, even though the cabinets where all the way up in Duvall, Gennie and the boys rode with me, making it a fun road trip, and also she commented "This is the nicest free stuff you've gotten off Craigslist so far, good score babe." WOOHOO! I am vindicated!
Next I got a free bookshelf from someone that lived only a mile away from me. It was about 7:30 at night and I called the number and let him know I could come right away. He called back with an address and I grabbed Liam, emptied out the car and headed over, thinking I could stuff it into the car and get home, even if I had to leave the tailgate open.
Of course it wasn't that easy. It turns out that the bookshelf was actually TWO bookshelves, and that they were heavy as hell, and they were wider than my car opening, and did I mention they were heavy as hell? They were heavy as hell. I acted confident when I told the guy I could probably just transport them on the roof racks if he'd be willing to help me get them up there. So I put all the shelf boards in the back, took the antenna off the roof, spread the roof racks as far apart as they would go and we hefted up the empty shelf to the roof racks.
 |
| Heavy as hell x 2! |
This guy was strong, even though he was twenty years older than me. I felt like I was going to drop the thing and he didn't even seem to be breaking a sweat. Up went the first shelf, and up went the second shelf. (It's a good thing Gennie never saw this.) I tied the shelves down with 50 feet of clothes line, which would break with a slight tug and gave the guy a thumbs up and a hearty hand shake and we headed for home at 3 miles per hour with 500 pounds of shelves resting on our roof. The picture here shows just one of the two shelves, 6 feet high, 4 1/2 feet wide, 15 inches deep and all made out of 3/4" laminated particle board, even the back is 3/4" laminated particle board, not that flimsy Ikea 1/8" hardboard. These shelves are heavy as hell!
Next I got a free floor cabinet/shelf unit. Probably something someone had in a laundry room or something. It has two side-by-side drawers on top and a couple of cabinet doors below with an MDF top. Both drawers are broken but that is not what I see when I see the ad. What do I see? Router table! I can remove the drawers and use the drawer fronts as a false face and install the router from underneath through the table top. Then I can install a fence and cut some tracks in the table for a guide and have an instant router table. It's perfect! Off I went and got it and brought it home. I'm still working on it because it is not going as simple as I pictured in my mind. It has wheels though so at least it's easy to move around the shop.

I also picked up some sort of art display fixture from an old craft store that someone was giving away. This too was heavy, but at least it was small enough to fit right into the back of the Pacifica. Liam and I drove up to Edmonds to pick this up. I saw it come on to Craigslist and called immediately and had it within 30 minutes. I felt like the Domino's pizza delivery guy, only I brought no pizza and left with the furniture. On the way home we got lost looking for the freeway and passed some free stuff on the curb. I had Liam hop out and grab the three or four boards you see leaning up against the cabinet in the photo.
I was able to score a full sized desk, complete with drawers and laminated top. The top itself was 1 inch thick so it weighed a lot. The guy giving it away helped me with the desktop itself but I was on my own for the drawers, sides, back and other pieces. I disassembled it into it's basic pieces, though I left the drawers in tact in case I need them. I like this desk because it has really thick laminated wood, just particle board, but the lamination makes it seem like it would be suitable to use as a router table top, or perhaps build some miter saw feed tables or a new drill press table. Heck, that 1 inch thick desktop is something like 3' x 6', it would make an awesome workbench top, considering how solid, heavy and smooth it is.
At this point my garage is getting pretty full and I still don't have a workbench. This does not stop me from wanting more free stuff, because now getting free stuff is funner than using the free stuff. I find an add for free cabinets that are available after they finished their remodel. Mahogany cabinets that had been painted, originally built in the 50's. Sweet! I'm going to get these and take them apart and re-use the mahogany for something wonderful and I won't have to buy wood for any projects for a long time! That's what I'm thinking anyway as I set up an appointment to go get these cabinets from the guy.
Once again I rent a u-haul, because after talking with him, it sounds like I'll have to make two trips with the car. Thankfully he's very close, a mere seven miles from my own house. I pull into his driveway with the trailer and realize I'll need to back it in if I expect to load up the trailer as there are other vehicles in the way. I promptly embarrass myself in front of the guy by getting the car and trailer all twisted up in the driveway. The trailer goes left, the car goes right, and pretty soon they are at right angles to each other. Sigh. After five minutes, he offers to back it up for me and in 30 seconds he has straightened it out and back up the trailer in a perfectly straight line all the way up to his garage. I am amazed.
We load up the first couple of big cabinets, the floor pieces. I realize that they don't make em like they used too, because these floor pieces weigh 400 lbs each and are massive. I also realize I'm going to need two trips with my U-haul trailer! Imagine if I had shown up with just the car. How silly would I have looked? Didn't matter, I took care of that while showing off my trailer backup skills.
During load-up the guy also asks me if I want all this other free wood, like a half sheet of 3/4" awesome quality plywood, two quarter sheets of 3/4" melamine, three or four hollow core doors and two or three half sheets of 1/4" hardwood veneer. Heck yeah! Throw it all in there! I take home the first half of the load of cabinets and wood and it immediately starts to rain all over my un-covered load of plywood, particle board and veneer. Awesome. I'd point out that they recorded 1/2" of rainfall that day, but it all fell during one 10 minute period while I was transporting my prize free wood in an uncovered u-haul trailer down I-405.
I unloaded the first pile of wood and cabinets directly into my garage and headed off for the other half after confessing to my wife that I needed to make two trips. I took off quickly so as to avoid having to answer too many questions... like "won't the rain destroy the wood?" or "what are you going to do with all that wood?" or "how are you going to fit it into the garage?" or "you know were are supposed to be driving to Olympia right now, right?"
It had stopped raining by the time I returned and I backed the trailer up to the guy's garage myself this time, using the technique I learned by watching the master an hour earlier. He than came out and said the rest of the cabinets are in his other garage on the other side of his house and that I should drive around back. BAH! I did so, and discovered myself in a three point turn situation with a U-haul trailer. I didn't even bother trying after I made the first point turn in the wrong direction and just handed over the keys. He executed a flawless three point turn in reverse and commented that it was much harder to do that when backing up an RV while towing his boat. I just smiled.
We loaded up the last of the cabinets, including the 25 painted cabinet doors and 6 or 7 unpainted mahogany shelves. He asked me if I wanted more free stuff, which of course I did. A 4x8 sheet of 1/8" oak veneer and a solid drawer rack with Rubbermaid drawers! Excellent! As we slide the beautiful piece of oak veneer into the trailer I commented on how I expected it to start to hail at any moment. It didn't hail, and after thanking the guy and assuring him that I'd make good use of his cabinets I headed home without incident, or additional moisture damage, and unloaded the rest of my loot into the garage. This is when I realize that I have a Craigslist problem. I have turned my garage into a hoarder nightmare!
And it is Awesome!!
Yes, I have my work cut out for me. I am tunneling my way through the cabinets, disassembling the ones that I see no potential for re-use and fixing up the ones that I do. I have a good stack of wood growing, and I have enough work now ahead of me to keep me busy every night for the foreseeable future. I have big plans for my workshop and for that, I need lots of raw material. It's going to be amazing. I don't even know what kind of stuff I'm going to make or if I'm even going to make anything at all. But right now, I'm having a great time, and that's what really matters.
All told, between tools and free stuff (u-haul rentals) I've spent $205 bucks. I have no more budget for stuff, so now it's time to build...
Is this a cry for help? Well... if by cry for help you mean help me lift more heavy stuff into my car, then by all means! Help! Do I have a problem? If you mean a problem storing all this awesome stuff because my garage is just too small, then yes I have a problem!
Stay tuned! I just saw a new posting for a $50 band saw...
Brought to you buy "The Amos School of Construction."

 I wasn't sure at the beginning what this would end up looking like, but I kept on digging and as I finished the first section I figured what they heck, and expanded into the second half of the area. May as well do the whole job all at once!